Pages

Beef Stew and Dumplings

Monday, November 7, 2011


OoOooHhh... this was a GREAT dinner tonight! .. seriously, I'm wanting to eat leftovers for a midnight snack! I thawed my meet cubes in the fridge over night and got it all started in the crockpot at 9 this morning. 

Here's the recipe I found online, but I'll just share here what I did for mine tonight cause it's just a tad different.. not by much though.

1 carton of beef broth
1/4 - 1/2 cup of Italian dressing
1/4 - 1/2 cup of BBQ sauce
1 tsp. dried oregano leaves
1 lb. of 1-1/4 inch stewing beef cubes
1 lb. potatoes cut up in chunks
4 large carrots cut in chunks
onion chopped up (I never use a whole one for the two of us!)
little bit of chopped fresh garlic (I added that) 

I put the broth, Italian dressing, BBQ sauce, and oregano together in the pot first. Then I browned the beef cubes for barely a minute in a pan on the stove and added them to the pot, along with onions and garlic. Turned the crockpot to "low." The potatoes and carrots actually didn't go in until an hour later, cause I had to run to the store to pick up some carrots. So I just decided I'd wait to put the potatoes in when I got back. The recipe said it should cook for about 8 hours on low. Mine was done probably around 6 hours, but I kept it going till Hubby got home for break. (The meat was perfect and tender!)

At around the last hour of cooking, I added a mixture of 3 Tbsp. of flour and 1/4 cup of water to the stew.. The recipe said to remove the meat, potatoes and carrots before putting those two ingredients in, and then serving it with pouring the thickened up juice over the top. But I just left everything in. It didn't really thicken up too much anyway. 

I also made dumplings! Hubby's grandma made a yummy stew with stew dumplings one Sunday afternoon and I LOVED it! So I found a recipe for those too, since I'd never made them before ..(I hadn't even eaten them before till I had them at his grandma's!) These are super easy to make! 

Dumplings for Stew: 
1 cup of flour
2 tsp. of baking powder
2 Tbsp. of dried parsley
1/2 tsp. of salt
1 beaten egg
1/4 cup of milk
2 Tbsp. of vegetable oil

First combine the dry ingredients, and then beat together the milk, egg, and oil in separate bowl. Stir that into the flour mixture. It will be really sticky and gooey. 


Just plop the dough into the crockpot by the spoonfuls, right on top of the stew. 


Twenty minutes should be enough time for the dumplings, so the recipe says. Mine actually cooked for about an hour. Hubby was supposed to be home at 4, so I put the dumplings in at 3:30.. but he wasn't able to get home till around 4:30! They were still perfect and yummy! 


Oh baby, it was the best meal I've had in a while! I know I just followed a simple crockpot recipe, but I'm still proud of myself for tonight's dinner. .. I'm not so great at cooking dinners.. most of the time I just don't like to.. That probably sounds terrible, but ... oh well, it's the truth :) I didn't say I "don't" make dinners. It's just not my favorite thing to do is all. Anyway, dinner was YUMMY over here! .. and I'm kind of craving some more right now! . . .


I Finally Caved In!

Friday, November 4, 2011

Well, I did it folks. I finally created myself a Pinterest account. I really hadn't wanted to because I thought it would just be another thing to keep me sitting around on the computer for more hours in a day!! But I think it's such a great way to store all your ideas and be able to go right back to the source you found it. So much more convenient then saving photos in a file on the computer.. yes, that's what I was doing before.. I know. Lame. Cause I bet for more than half of the files I've saved over the past couple of years I wouldn't be able to find the source again.. even though I tried renaming the photos with the name of the blog I found it from! Anyway, enough of that, so I created a Pinterest account. Not just for the convenience of course, it's also such an inspiring place to be! Love it! But I have to admit, I sit around getting inspired from the internet way too much and not actually putting all that inspiration to work. Am I the only one?? 

Come find me on Pinterest and see my taste! 

I also added the "follow me" button to my right side bar --->

I love you still ...

Wednesday, November 2, 2011


Last Monday, October 24th, was our two year anniversary. I can't believe how fast time flies! In a way it feels like our wedding day was just weeks ago, but then it also feels as if we have been together for as long as we can remember.

We both had to work on our sweet day, so we decided we'd go away on the weekend since we had Saturday off. So this past weekend we went to Saint John, just a couple hours drive away. We stayed in a nice big hotel and just relaxed :) We watched our wedding video.. always sweet memories when seeing it again. 
It started to SNOW in the morning.. it was a wet yucky snowy rain. So there really wasn't much for us to go around the town and do like walking through some of the pretty parks. But we had to leave our hotel room in the afternoon, so we checked our GPS and spent a few hours just driving around seeing what was open. 

Before we left for home we found out there was a Taco Bell in that city! I hadn't eaten Taco Bell since I've been home in California- that's TWO YEARS! So we definitely stopped there for lunch! YUM. 

Our anniversary went by MUCH too quickly.. but I'm glad I have my husband every day. God has blessed me more than words can tell and I am so thankful for my husband. He's a good man, he's so good to me. We have grown alot in just these two years. We've had rough times that have only made us stronger and care for each other more. We realize that our marriage can never reach what it should be if are doing this without God. He is our guide as we continue on this journey. 

It may only be just our two year mark, but sadly, many couples can't say even "two years" for their own marriage.. 

I love you Joel! 

Est. October 24th 2009


Versatile Blogger Award!

Sunday, October 23, 2011

Guess what!? Today I was awarded the Versatile Blogger Award! 
That's pretty exciting to me! It's nice to know that people find some enjoyment through my blog and what I like to do and share. 


Thanks so much to Brandy over at With a Shot of Brandy for choosing to award me!

THANK YOU SO MUCH BRANDY! .. for awarding me, and for taking the time to read my blog. 

Here are the rules for this reward: 

* Thank and link back to the person who gave you this award
* Share 7 things about yourself
* Send the award to 10 other bloggers and let them know you have awarded them!

7 Things About Me

1. I'm a lover of many things crafty and creative :) 
2. Originally from California, I met my Canadian hubby in Wisconsin during grad school.
3. Currently a waitress at a small restaurant
4. Home schooled from K-12th grade -- thank you mom! 
5. Brought up in a Christian home, saved at age 5, and have a desire for the Lord and His work in my life! 
6. I spend way too much time online
7. My weakness is ice cream and I can never say NO :) 

And now my 10 awards go to . . . 


 All of these bloggers are my favorites and I enjoy reading each of their blogs!

Congrats!! :) 


Cheap Earring Displey Holder: Craft Room

Wednesday, October 19, 2011

Hello, it's me! ... I feel like a stranger on my own blog! Oh how I've missed blogging about crafts and projects and such.. I just don't have much to share these days. There are a few larger projects that I'm in the middle of procrastinating working on for our master bedroom though, and I can't wait to finish those up! So until I have those projects complete I think I all stick to some smaller projects that I can finish right away without sweat, tears and involving laziness! 

This week I made myself an earring holder for some of my shop earrings.

I  just bought a grease strainer thingy at the dollar store . . .
(I saw this done before online somewhere but don't remember where)


 . . . and painted it with my pretty new Krylon Watermelon paint that Hubby got me for my birthday. 
(I'm using it sparingly and saving most of it for something good because it's special).

Then I hot glued twine around the handle and glued on a little loop for hanging.


Filled it up with earrings and there you go! 
Told you it was one of those quick projects :)


For now I like it.. until I'm inspired with a better idea for displaying my shop earrings! :) 

The color looks nice and pretty next to my bright blue cork board! Oops, sorry for not photographing that though.. my camera was dying on me. But I am working on putting a few more things on my craft room wall and then I'll get some nicer pictures to show. Promise.

Crock Pot Apple Crisp

Thursday, October 6, 2011

I. Love. Fall. 

.. I know, I've said it before.. many times, but I just really do love it! When the days start turning into fall I get this feeling in me.. The smells of fall, .. in the outdoors, in the kitchen, candles.. The chilliness, coziness, pulling out some light scarves, comfy sweaters... Yes, I'm getting to my point of this post, I'm just building it up! 

Fall makes me want to bake things! Lately I'm wanting to bake all sorts of yummy sweets. I haven't jumped at every urge to bake something though, thank goodness! But I was recently inspired by one of the blogs I follow {A Law Student's Journey} to make apple crisp in the crock pot! Mmmmm. So I tried it! And boy was it gooooood. I looked online for some recipes, and I kind of followed a few different recipes. 

How to make Apple Crisp in your crock pot

I peeled and sliced about 8 to 10 apples (6 cups sliced apples). 
Mine were actually small apples, so you may want less apples if yours are larger. I just bought a bag of apples. 


After peeling and slicing, I threw the apples into the crock pot. 
Then in a small mixing bowl I added these ingredients: 

1/3 cup white sugar
1 Tablespoon cornstarch 
1/2 teaspoon ground ginger
1/2 teaspoon ground cinnamon

Mixed that up then dumped it into the pot with apples and stirred it up. 
Then I added 2 Tablespoons of lemon juice and stirred that up.


{The smells were already getting to me!} 

Next for the topping.. 

Mixed these ingredients in a bowl: 

1/2 cup of flour
2/3 cup rolled oats
1/2 cup brown sugar 
1/2 cup white sugar 
1/2 teaspoon ground cinnamon
1/2 teaspoon ground nutmeg
1 pinch of salt

 {one of the recipes I was following didn't include oats, so I added oats from another recipe, and cut out half the flour. Not sure if cutting the flour is necessary.. but that's what I did}

Then I cut 1/2 cup of butter into little pieces, added that to the flour, sugar and spice mixture and squished it all up with my hands into a crumbly mixture- great fun :)


Mmmmm I love crumble toppings! 
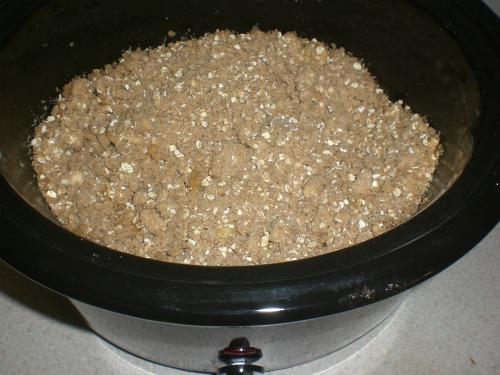
The topping mixture just goes right on top of the apples. Y.U.M.


On goes the lid, temperature set to LOW. Leave it for about 3 hours then take the lid off for about an hour so the crust topping can .. do what it's supposed to.


I couldn't wait to find out how this would turn out! I've never made an apple crisp  in my life! I've actually never done these kinds of baked goods before. Apple pies, apple crisps, other fruit pies.. 

Here's a look at it all done and ready to be eaten up


And it was definitely eaten up! We had Hub's parents over that night to enjoy some of it with us. They loved it and said it was super yummy! I'm not really crazy about apple desserts, but this was great! 


Y.U.M - Y.U.M - Y.U.M - Y.U.M - Y.U.M 


This is me beaming with pride for making my first apple crisp 


And this is Hub's saying to himself, "My wife is AWESOME!" :) 
{Yes, I have attained the gift of reading my husband's mind.}

Enjoy, and have yourself a yummy fall treat!


Sweet Blossom Earrings Giveaway at Domestic Fashionista!

Hi Friends! I feel that I've been neglecting the blogging stuff these days... I feel like there is so much I need to do and plan and plus there's the job I have now. I need to get myself more organized and disciplined! .. yeah right

Well I do have something exciting for you today! 
Remember my Sweet Blossom Earrings??? 


Ashley from Domestic Fashionista is having a giveaway on her blog RIGHT NOW, and someone's going to win a pair of my earrings!!!

So what are you waiting for?? 


DIY Cork Board and Thumb Tacks: Craft Room

Wednesday, September 28, 2011

I've been turning our spare bedroom into a little craft station for myself. .. Right now it's a mess! That's my "stash everything in here" room! haha! Anyway, when I have it more set up how I want, I'll do more posts about it :) For now I'm just going to show you my pretty corkboard I put together for my wall. 

I found this big wooden frame at my thrift store for $2. 


The backing looks like cork but it's not. So I had to buy some sheets of cork, which I found for $2 for a pack of 2 squares at the dollar store! I picked up two packs since one wouldn't be enough. 

I just hot glued the cork right to the frame backing. You can see how it hangs over the side.. so I used my little exacto knife to cut the edges off.

To cover up the obvious lines I bought a fat quarter of fabric at Walmart and glued the sides down to the back of the backing. I guess I didn't take a photo of this part, but you can just imagine this process :) Pretty simple and easy. I wanted fabric that wouldn't stand out and be distracting from the pretty blue that I painted  my frame, so I picked some out that look super close to the color of cork. Here's an up close look at the fabric. You'd think it was cork from seeing it father away, which is what I was going for.


And here's my new pretty corkboard! 


I just used a plain ole bottle of acrylic craft paint and painted about 3 layers on. Then painted a couple layers of a clear coating. 
 Ready for more F.U.N ?! 
I made my own cute thumb tacks too! 

I took all these little odds and end..
{buttons, tiny crochet flowers, fabric covered button,
and a glass marble that I mod podge to some fabric} and hot glued them to some plain thumb tacks I had.


cute, cute, cute! Right?!


I'm throwing my sister a baby shower when we go home to California for Christmas! 
{by the way, my sister finds out today if it's a boy or girl! eek!)


It's super nice having my own little area for all my craft stuff! Usually it's ALL OVER the apartment! I'm definitely going to be working on this little area {I call it my craft station}, so there will be more posts to come!

p.s... today has been the most beautiful fall day!
... again with the romantic-y dreamy mood.. 

Crochet Ruffle Scarf

Wow, It's like I've been avoiding blogging like the plague! ... Not really, I just haven't had anything great to blog about. I do have a bunch of projects I'm in the middle of, but it could be ages before those are done because, I'm pretty sure I've mentioned it before, I tend to procrastinate things. I'll try to work on that.. cause I have some things I really want to share!.. before I get gray hairs. 

This week I was feeling in the mood to make a scarf. I haven't done one in a great long while, so I bought some pretty yarn. I love this color. It's called Pale Antique Rose. Isn't that a pretty name too? I was planning on just making one of my normal scalloped scarves, but I decided to try and make ruffles instead. I didn't follow any pattern for making ruffles, I basically just figured it out on my own.. 

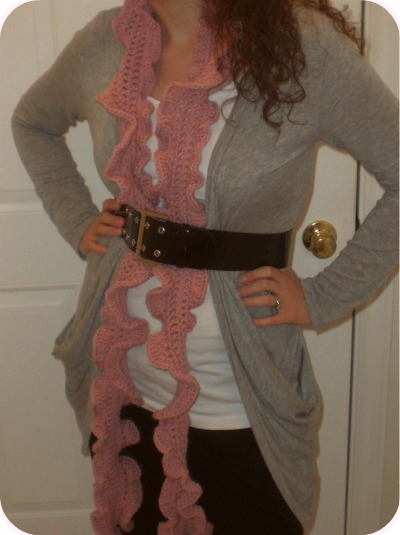
Ta- da!


I like it and can't wait to wear it! .. Well, I CAN wait, .. cause really I'm not looking forward to winter gracing us with its presence again. I'm rather sad about the summer ending, but now that fall has started showing itself, I don't mind it getting a little teensy weensy bit cool. I love fall. It makes me all romantic-y and dreamy and I want to go buy pumpkins and put them everywhere in our apartment and burn yummy smelling candles all day long--(big breath for air!) 

back to the ruffly scarf I made...


Lovely, right? :)


I thought I'd share the tiny little instructions on how I did the ruffles in case anyone's wondering.

So first things first, I made the foundation row 210 chain stitches long. 
Then I did 3 rows of double crochets.
For the ruffles on the first side (which is the opposite side of the foundation chain stitches) I did 3 double crochets in EACH stitch all the way across.
(no skipping spaces at all).

Like this.. 
(the gray ovals represent the stitches you are stitching into)
 
For the other side of the scarf I did things a little different. I alternated between 3 double crochets in one stitch, and 2 double crochets in the next and continuing in that pattern. 

Like this..
I did it this way because I was finding that the foundation stitches seemed to be a bit scrunched and closer than on the other side of the scarf.. When I was doing 3 double crochets in each stitch everything was tighter and the ruffles were smaller than the other side. So by doing it this way, to me it seemed to even them out more to look like the other side.

And yes, the ends will look a little strange too. So what I did for the ends was just add double crochets right along the ends to make them rounded. Not sure how to explain this part, but I just put double crochets anywhere on the ends to get it across and connect to the other side's end with a slip stitch.

Here's a photo of the finished ends which might help with understanding..


They aren't perfect, but they look SO much better then if I hadn't finished them this way.

So that's my ruffle scarf! 

I'd love to make a few for my shop too, so we'll see that how that goes!


If you make your own ruffle scarf I'd love to see it!
Feel free to leave your a link to your own ruffle scarf blog post in a comment
if you make one!!