Pages

Funky li'l luggage tags

Saturday, May 29, 2010


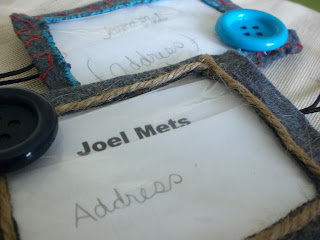
For our trip to Saskatchewan I thought I'd make some address tags for our luggage. I think they turned out cuter than I thought they would.. even though they are a bit on the funky side. And I tried making my husband's less happy and colorful as mine. I asked him, "would you be embarrassed if I put this big button on it??" Well, I guess my little luggage tags weren't a threat to his manliness because he put the tag on his luggage and away we went on our trip! hmm, maybe he just used it to make me feel good. .. No of course not. He LOVES his luggage tag!

Here is what I used to create my funky little concoction
1. an old shirt I wasn't wearing anymore
2.thin cardboard (frozen pizza or cereal box)
3. scissors
4. hot glue gun
5. ziplock bag 
6. colored thread
7. twine
8. large buttons 


Here's the shirt I never wore much. I cut off a sleeve...


.. and then traced a small rectangular object (I used the little case that my birth control pills came in!)
Since there are two layers on the sleeve as it lays like that I just kept the shirt's seam as my ... hinge? *laughing to myself* Do you get the picture?


See? The two layers stayed connected since I left the original seam. Make sense? Then I just cut a sloppy square from the top piece.


And here it is as it's layers are together


We ate a frozen pizza the night before so I used the cardboard from it to cut almost the same size pieces. And with my corner punch I rounded the corners nicely. **Delissio frozen pizza by the way is Y.U.M! I think it might be a Canada thing though.. kind of like how the states has Dijiorno. Seriously, their commercial says, "It's not Delivery, it's Delissio." HAHA! Just like Dijiorno!** .. Okay enough about pizza cause now I'm craving it.


Then I picked out a pretty bright blue thread and sloppily stitched around the inner frame. The button I picked out to put on my luggage tag was actually this exact color, so I was happy when I found this color thread in my little itty bitty stash! This part took a stinkin' long time, and I wasn't even making sure it was perfect! But it looks cute all sloppy. (I also added some red thread to the front flap, which is seen in the finished photos since I didn't take a photo of just that part done.


Obviously the bright blue thread one is MINE, and for Joel's I used twine.


Ah yes, the crazy part. To make it a little tidy I just used my hot glue to bring the edges nicely around the cardboard. This was a sloppy process and it's hard to give all the details I did cause I just glued here and glued there to get what I wanted.


A ziplock bag worked great for the plastic protective sheet which would cover the address. I carefully glued that piece down to the top fabric piece. Be careful with the glue because it melts the baggie! I melted a little hole in mine **sad face** Oh well! It's still fine.
Then I cut the excess baggie off as close to where I glued it as I could. After that was done I glued down the right and bottom sides of the tag. On the left side the material will be all shabby and sticking out so as carefully as I could I put a little glue on the inside of the top left piece and tucked it in. Making sense?


NOW what was I going to use for the stretchy piece that you wrap around your luggage handle????
Oooh!! I love this part! I just bought a pair of flip flops (4 bucks at Walmart by the way) and look what I found on them!!! 


SUPER COOL!! I cut this stretchy string in half and it was just enough for our two tags!!
Then on went the big'ole buttons. Have I mentioned how much I like those big'ole buttons? NO?? Well guess what? I like these big'ole buttons! They're FUUUN.


And there ya have it.
After I made these I figured I could have cut the whole frame out from the cardboard and just glued the fabric to it to make the tag more sturdy.. it probably would have been easier too! .. maybe.

Well, time for me to go sit with my husband while he watches a hockey game. I {heart} sitting with my husband! And I double {heart} when he says, "hey babe, come sit with me and keep me warm!" 

Good night blog land


Relection

 Well, Saskatchewan greeted us with cold and rainy weather! Leave it to me to wear flip flops. My husband's dad drove us to the airport at 3 am this morning so we could catch our 7 o'clock flight. Sleep was something we hadn't gotten yet, so the two hour car ride was a bit quiet. As I was day dreaming out the window into the dark morning sky I couldn't help but stare at the bright full moon. It was a nice reminder for me to appreciate God's beautiful creation. Then I got to staring and pondering some more.. That moon, to me, represents God as The Light of the world. My thought gets better... I looked down and saw that the moon was casting its reflection off the river below and thought to myself how we as Christians are to reflect God's light and image as we grow in Him. But the reflection I saw in the rippled river wasn't even as clear or beautiful a picture as the true moon in the night sky. Wow. What a truth! No matter how much we grow in Him and strive to become closer to what He is, the reflection, even though it is a reflection of Him, just doesn't match the true image perfectly. I love how God loves me enough to show me truths such as this in a way such as the one this morning. 

He is so big, and I am so small
Thank you Lord for keeping me humble

Flowers Galore!

Friday, May 28, 2010

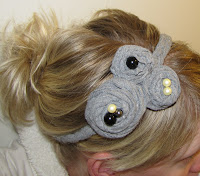
Everywhere I go on blogland I see these SUPER ADORABLE homemade little fabric flowers! I mean, they are just down right CAA-UUTE! This week I actually decided to try and make my own. What made me start on my attempt was this lovely little idea I saw from Me and My Bucket. (her picture below)


Don't you looooove it?? Mine didn't turn out quite like hers, but I'm very happy with it and can't wait to wear it and show it off. Okay, I'm about to cry because I just remembered that I didn't take a picture of MY headband. Why? Um, well.. I wanted to wear it for the picture and my hair was a big mess. But when I do take a picture I'll edit it into my post.
Making the flowers for the band is the fun part of this little creation. Make sure you check out her blog for instructions on making them. OOH, there's also a video I watched yesterday about making fabric flowers. Click here for the video tutorial from Little Birdie Secrets.

Moving on! This post isn't ALL about the headband I made. So let me just show off some of the A-DORABLE flowers I made this week. 
I just sat down on the floor with a couple old shirts and my hot glue gun and started cuttin' and gluin' away... I like watching something on my computer while I work on small things and I'm watching all the seasons of Boy Meets World right now-- remember that? My husband has them all on dvd! **hummmmm.. I wonder if that has anything to do with the glue gun burns I have!?**
But aren't these cuties? Just cut shorter and thinner pieces of material to make smaller flowers. I'm so not the measure type of person. I'm so lazy... I'll learn to be more like that for more important projects. For these though, it's rewarding to make them not-so-perfect! 


And then this... 


... I can't wait to wear this one either! AAAH, I know! I see the glue spots too! I'm not too worried about it though. It'll still look pretty and cute. And there's the kind of clip I used to glue the flowers on. These kinds of hair clips don't work so great in my hair though. My hair is curly and has a great potential of being BIG (my friends call me Big Hair.. I've grown to love this little expression of affection). So when I use these clips I can't get it too full or there's no clasping of this clippy!

I think this next one is my favorite. Same little fabric flower, but NOT for hair ... 


Isn't this a beautiful kitchen table and chair set?? We got it around Christmas time from Walmart actually. I fell in love with it when I saw it and knew right away this was what I'd been looking and hoping for. Sad thing, the table top gets little knicks and scratches so easy and I have a heart attack every time I see a new one! .. I get all teary and lose my appetite. .. Okay not really. But I think I've made it clear that my little heart is NOT happy about scratches on my table. Well, my husband and I are going to Saskatchewan for the summer to work at a church while the pastor and family are away, and my sister in-law has asked if she can stay at our apartment here and there to get away from home when she feels like it. Sure! I'm such a picky little paranoid, so I ran to the dollar store and picked up a cheap tablecloth to somewhat protect the table top while we're gone. I'm sure nobody is going to be picky about our table like we are about it! The tablecloth was a little on the big side so I just cut it down to look a little nicer. It frayed like crazy when I cut it, but hey, it was only 2 bucks! I made some of those A-DORABLE little flowers, (which are my current best friends) and hot glued one to each corner of the tablecloth. I really L-O-V-E it!! 


... I hot glued some little pearl-looking beads on them.


You can kind of see the two corners in this photo. 
Doing this to the corners helps keep the tablecloth from moving around and sliding off.
Like the basket on the table?? I got it from Canadian Tire for 3 bucks!! Actually FREE for me since I paid with a gift card! Whoo-hoo! I really love baskets. Oh and those Chrysanthemums are fakes that I used for our wedding. Fake flowers are fun! (so says this WHOLE post!) Anyway, so can you tell I'm loving my fabric flowered tablecloth? Cause I am! 

These next flowers aren't fabric ones, but they're just as cute and fun!

My paper rose.
Don't laugh at it's funkiness... I tried! And it's not SO bad. 
Little Birdie Secrets has another video tutorial that you should check out RIGHT NOW! After watching the video I just HAD to try one for myself. I know, it's not nearly as cute as Little Birdie Secret's.. I think I made my paper too long. Not sure. And I don't have super cute paper like hers either. (sad face). I cut out some leaves for my flower and used an ink pad to the edges... oh and a red ink pad for the flower.. is it visible?


I hot glued a small strip of magnet to the back and now it's a cute little 3D magnet. It makes me smile big. 
I'll try some more of these cuties soon for more perfection of the skill! 


Here's my last little flower to show off... 


I can't remember where I found the idea for this one, so I'll tell ya how I made it. The flower is made from magazine pages and some pink cardstock. I cut out super imperfect circles (the more crooked and crazy the circle is, the better) at a bunch of different sizes. The tutorial I saw this from put the petals together with a brad pin, but I don't have any so I just glue (don't remember if it was hot glue, mod podge, or glue stick!). I inked up the petal edges with ink pads and glued on a little button. Me likes! 


I glued my paper rose onto a plastic clothespin I painted black, then hot glued a strip of magnet to the bottom of the clothespin. 

This is now being used as my recipe holder!


CUTE?? For sure!!

Hope you enjoyed all my little flowers as much as I did making them. 
Happy weekend to everyone!

I have some more posts of recent projects that I'll post later when we're finally in Saskatchewan. 
Until next time.. keep up the craftin'!


Twine is SO cool!

Thursday, May 20, 2010


This stuff is SO much f-u-n to work with! Here are some things that I've spiced up by adding twine

Pickle jar for my kitchen utensils

Ice cream container for a cookie jar
(which was made in a rush!)

I made some cookies late the other night that were for a birthday party after church the next day. After rummaging through the kitchen I realized all my rubber maid containers were in the fridge with leftovers and all I had were ice cream containers to put them in. Me being the person that I am (aka "Oh I don't want anyone to think I brought ice cream!") I decided that I just had to do a little "somethin' somethin" to the container to make it cute. It was really late and I still needed to take a shower for church in the morning, but I just couldn't stop decorating this thing... it was quite a disturbing site in the beginning stages when I was adding the ripped cardstock to the sides with mod podge. My husband and I kept laughing about how ugly it was while I was making it! But I think it turned out pretty cute.

Fridge magnet from pickle jar lid


Boredom struck the other night while my husband quietly sat next to me on the couch preparing his sermon for Bible conference coming up. I needed something to do, so I thought I’d make a cute little magnet with a pickle jar lid I saved. The picture looks funny because I printed it on regular paper and the ink is running out. I thought the twine would add cuteness to it so I mod podged it all along the side.


 Homemade greeting cards


Decor balls


I love how the twine looks on my homemade décor ball! This set isn’t quite finished yet, but I'll post about it when it is. I’m still trying to figure out what to do with the little black one. I just keep staring at it every day wondering what interesting thing I could do with it. 

Here are some other creative twine ideas I found while searching blog land

I found this monogram wrapped with twin over at Shanty2Chic 
It's so cute!!
Our last name starts with an M and it would be A-DORABLE!


Here are some more decor balls wrapped in twine that I found from House of Hepworths
 OOH, I just l.o.v.e the two tone ones!   


This pretty little vase is from These Creative Juices


So simple and yet very attractive is this little thrifted and 
fixed up canister from A little of this, A little of that

I'm amazed at how people make the plainest things so beautiful! 


Look what else I found! A twine DISPENSER!!
It was on a Martha Stewart website. She says to get a clean paint can from a paint shop 
and drill a hole in the lid for the twine... so there's no rollin' away of the twine while you're craftin' away. Now if that's not a great idea.. ! And of course, you can always decorate it to add more cuteness. 


V and Co decorated terracotta flower pots with twine  


 Are you convinced that twine is so cool?! 
Be creative and have some fun with it! And then let me know 
what AMAZING thing you've come up with. 

Until next time, happy crafting!

Tangerine Medicine Box

Saturday, May 15, 2010

Lately I seem to be searching like crazy around our apartment for things I can do little makeovers on. I have found a new love at being able to change yucky junk into something a little better to look at. You know, just married, starting out in our first apartment.. it's having to make do with the things we might consider only "temporary." On that note, .. You know those little thin shabby boxes that Tangerines or little fruits come in?

Well, we have one and I keep all our medicine type of things in it up in our cupboard. I like keeping random little boxes and baskets so I can cram stuff in them or keep things tidy.

I gave this junky little box a few coats of black paint, minus the sides though (with the fruit writing on it). For the sides I measured, cut out, and mod podged scrapbook paper to them, then coated a couple layers of mod podge on top too.


 For painting "Medicine" on the front, I printed out a nice "M" in the font I wanted using Microsoft Word. 

Let me tell you, it's REALLY hard trying to make your own stencil without an exacto knife! .. I really need one. But yes, I used scissors (sigh...). After taping on my homemade little stencil I painted it in. Then just freehanded the rest of the word to make it look different... mainly because it was too hard making the "M" stencil! I don't appreciate my freehand painting as much, but hey, I still think it looks cute!


After all the painting was finished I put a couple coats of a sealer on it.

And here it is with all the meds


*Laughing* Three of those bottles in there were added just this past week when an infected tooth of mine started giving me the worst pain I've ever felt in my entire life! One of the bottles was prescribed by the doctor in emergency and it made me SO sick to my stomach for a whole day! Definitely won't be taking any of those again unless the pain comes back and I feel like I want to die! So this tooth infection story was a side note, but hey, it's another major thing going on in my life right now. We're leaving for Saskatchewan in 2 weeks for the whole summer and we were hoping for an opening at the dental specialist for my MUCH needed and URGENT root canal. So far there are no openings. Doesn't mean I stop praying for one though! The antibiotics I was given have helped alot with the swelling and the pain has gone away. I'm still really nervous about leaving for the summer if I don't get my root canal. God knows what I need though.

ANYWAY!

So that's my junky little tangerine box turned C.U.T.E to look at.
Oh yah, and I didn't paint most of the inside! What for?? 


Mother's Day Poppy Canvas


My mom absolutely L.O.V.E.S poppies! She's always in her yard planting them everywhere, and other flowers as well but she really favors these little flowers. When I saw THIS I thought it would be super cute to make for my mom. Although that piece of art is extremely A-DORABLE I don't know a thing about crocheting and so I just kept it simple and glued my yarn down to the canvas in circles. 

What you need for this super cute, easy and fun project: 
 1. small painting canvas (I got mine at the dollar store)
2. paper grocery bag torn up in pieces 
3. Paint for the canvas (I used spray paint)
4. yarn 
5. hot glue gun
6. oil pastels (also found at the dollar store)
7. Mod Podge

I ripped up pieces of the paper bag and mod podged them to the canvas for a nice textured look then spray painted it brown. Gluing the yarn in circles was the most time consuming part of the project and I only used the hot glue gun for the very start/middle of each of the poppies, then used mod podge the rest of the way until each flower was finished. Next the oil pastels made for great stems and leaves, and then I coated the canvas (minus the poppies!) with a couple layers of Mod Podge to protect and seal it. Done. Then off in the mail, heading to California it went! 
Mom loved it!