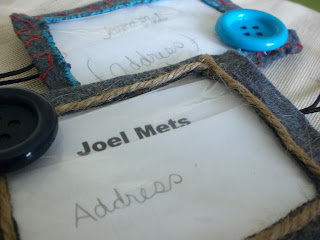
For our trip to Saskatchewan I thought I'd make some address tags for our luggage. I think they turned out cuter than I thought they would.. even though they are a bit on the funky side. And I tried making my husband's less happy and colorful as mine. I asked him, "would you be embarrassed if I put this big button on it??" Well, I guess my little luggage tags weren't a threat to his manliness because he put the tag on his luggage and away we went on our trip! hmm, maybe he just used it to make me feel good. .. No of course not. He LOVES his luggage tag!
Here is what I used to create my funky little concoction
1. an old shirt I wasn't wearing anymore
2.thin cardboard (frozen pizza or cereal box)
3. scissors
4. hot glue gun
5. ziplock bag
6. colored thread
7. twine
8. large buttons
Here's the shirt I never wore much. I cut off a sleeve...
.. and then traced a small rectangular object (I used the little case that my birth control pills came in!)
Since there are two layers on the sleeve as it lays like that I just kept the shirt's seam as my ... hinge? *laughing to myself* Do you get the picture?
See? The two layers stayed connected since I left the original seam. Make sense? Then I just cut a sloppy square from the top piece.
And here it is as it's layers are together
We ate a frozen pizza the night before so I used the cardboard from it to cut almost the same size pieces. And with my corner punch I rounded the corners nicely. **Delissio frozen pizza by the way is Y.U.M! I think it might be a Canada thing though.. kind of like how the states has Dijiorno. Seriously, their commercial says, "It's not Delivery, it's Delissio." HAHA! Just like Dijiorno!** .. Okay enough about pizza cause now I'm craving it.

Then I picked out a pretty bright blue thread and sloppily stitched around the inner frame. The button I picked out to put on my luggage tag was actually this exact color, so I was happy when I found this color thread in my little itty bitty stash! This part took a stinkin' long time, and I wasn't even making sure it was perfect! But it looks cute all sloppy. (I also added some red thread to the front flap, which is seen in the finished photos since I didn't take a photo of just that part done.
Obviously the bright blue thread one is MINE, and for Joel's I used twine.
Ah yes, the crazy part. To make it a little tidy I just used my hot glue to bring the edges nicely around the cardboard. This was a sloppy process and it's hard to give all the details I did cause I just glued here and glued there to get what I wanted.
A ziplock bag worked great for the plastic protective sheet which would cover the address. I carefully glued that piece down to the top fabric piece. Be careful with the glue because it melts the baggie! I melted a little hole in mine **sad face** Oh well! It's still fine.
Then I cut the excess baggie off as close to where I glued it as I could. After that was done I glued down the right and bottom sides of the tag. On the left side the material will be all shabby and sticking out so as carefully as I could I put a little glue on the inside of the top left piece and tucked it in. Making sense?
NOW what was I going to use for the stretchy piece that you wrap around your luggage handle????
Oooh!! I love this part! I just bought a pair of flip flops (4 bucks at Walmart by the way) and look what I found on them!!!
SUPER COOL!! I cut this stretchy string in half and it was just enough for our two tags!!
Then on went the big'ole buttons. Have I mentioned how much I like those big'ole buttons? NO?? Well guess what? I like these big'ole buttons! They're FUUUN.
Then on went the big'ole buttons. Have I mentioned how much I like those big'ole buttons? NO?? Well guess what? I like these big'ole buttons! They're FUUUN.
And there ya have it.
After I made these I figured I could have cut the whole frame out from the cardboard and just glued the fabric to it to make the tag more sturdy.. it probably would have been easier too! .. maybe.
Well, time for me to go sit with my husband while he watches a hockey game. I {heart} sitting with my husband! And I double {heart} when he says, "hey babe, come sit with me and keep me warm!"
Good night blog land


1 comment:
Cute idea! Very creative!
Post a Comment